

Portable Solar Cooker
In the Spring Semester, 2013, I served as a Tutor to the General Engineering 212 (Introduction To Engineering Design) course, taught by Professor Kamyar Khashayar, which gave student teams an opportunity to design a unique solar cooker in SolidWorks program and to prototype the design using available parts as well as the prototyping equipment available at the Computer Lab of East Los Angeles College’s Engineering and Technologies Department. At first, students visited the Engineering Department at California State University Los Angeles to study previous solar cooker prototypes created by senior-year students over there. Next, teams of students used the Product Design and Engineering Process to design and prototype their solar cooker. The team I worked with included two students, Roger Monarrez and Willy Fonkoue. We decided to design a solar cooker that could be easily assembled, disassembled, and portable, for use outside of the garage or during outdoor camping. Through “brainstorming” process, Our team came up with a few solutions. This page displays my solution for the project completed with SolidWorks program.
The following are YouTube videos related to the design, fabrication and use of solar cookers, and they are worth watching to learn how solar cookers work first-hand:
How to Make a Parabolic Solar Cooker. This video shows a solar cooker with the food container hanging from a beam-pole structure attached to the base.
Solar cooking: How to build a solar cooker from a satellite dish. This video shows the testing of a solar cooker prototype。
Making a Parabolic Mirror the Cheap Way. This video shows how to make a simple solar cooker under 3 dollars。
1 Minute Grilled Cheese Solar Cooking Parabolic Mirror Concave mirror: This video shows how a variety of food are cooked with a simple solar cooker。
There are organizations promoting solar cooking as an energy-saving activity. The soloarcooking.org is one of them. “The Solar Cookers International Network is an alliance of NGOs, manufacturers, and individuals actively promoting solar cooking in more than 120 countries. This wiki-based site allows members to share information on projects and research.” This organization’s website features three buttons guiding to the following solar cooker related issues:
Build a Cooker. This page explains the process of making a simple solar cooker.
Buy a Cooker. Advice on purchasing solar cookers are offered here.
Teaching and Promotion. Instructional materials related to solar cooking could be found here.
Any question? Please email me: [email protected].
Some Useful Hints for Solar Cooker Design
1. The base of the solar cooker must be steady enough to resist toppling over in the wind.
2. To follow the sun throughout the day, the parabolic dish (or disk) must be able to rotate around an axis parallel to the ground.
3. The food container should be placed precisely at the focal point of the parabolic disk.
4. Parabolic disk could be made with sheet-metal, square mosaic mirror pieces and others provided that the surface of the material is smooth and has a good reflectivity.
Parabola and Solar Cooker
According to Wikipedia, the free encyclopedia, a parabola “is a two-dimensional, mirror-symmetrical curve, which is approximately U-shaped when oriented as shown in the diagram, but which can be in any orientation in its plane. It fits any of several superficially different mathematical descriptions which can all be proved to define curves of exactly the same shape. One description of a parabola involves a point (the focus) and a line (the directrix). The focus does not lie on the directrix. The parabola is the locus of points in that plane that are equidistant from both the directrix and the focus. Another description of a parabola is as a conic section, created from the intersection of a right circular conical surface and a plane which is parallel to another plane which is tangential to the conical surface. A third description is algebraic.”
A solar cooker, or solar oven, “is a device which uses the energy of direct sun rays (which is the heat from the sun) to heat, cook or pasteurize food or drink. The vast majority of solar cookers presently in use are relatively cheap, low-tech devices. Because they use no fuel and cost nothing to operate, many nonprofit organizations are promoting their use worldwide in order to help reduce fuel costs (for low-income people) and air pollution, and to slow down the deforestation and desertification caused by gathering firewood for cooking. Solar cooking is a form of outdoor cooking and is often used in situations where minimal fuel consumption is important, or the danger of accidental fires is high.”
My Design for a Portable Solar Cooker and Oven
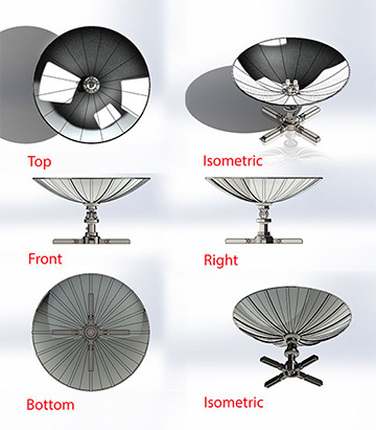
Figure SO-1. Orthographic and isometric views of the assembled Portable Solar Cooker and Oven.
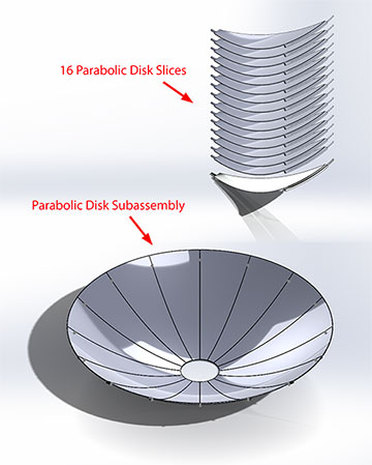
Figure SO-3. In this Portable Solar Cooker and Oven, sixteen Parabolic Disk Slices could be easily assembled into a parabolic disk to perform cooking functions by concentrating the thermal energy generated by sun rays at one single focal point. The parabolic curve used in the design of the Parabolic Disk Slices has been created by student Roger Monarrez using mathematic formulas.
The Parabolic Disk Slices could be made of bent sheet-metal sheet (preferably stainless steel with high reflectivity) and metal rods, either custom-built or mass manufactured. The Parabolic Disk Slices could be staked during transportation.
|

Figure SO-2. Parts of the Portable Solar Cooker and Oven.
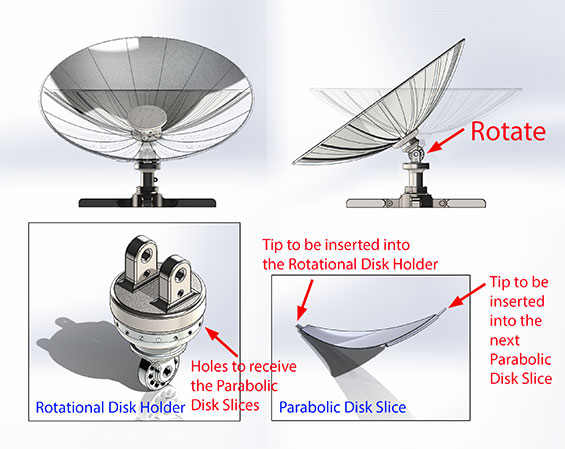
Figure SO-4. The assembled Rotational Parabolic Disk (top) could be tilted to accommodate the change of location of the Sun throughout the daytime. The Parabolic Disk Slices could be assembled into the all round Rotational Parabolic Disk with the tips that go into each other slices and into the holes on the Rotational Disk Holder (bottom).
For details about how parabolic reflector works, read the following online articles from Wikipedia, the free encyclopedia:
1. Parabola. This article includes a lot of mathematic formulas for the design of parabolas and determinations of their focal points. 2. Solar Cooker. This articles covers many types of solar cookers and explains the scientific principles used in solar cooker design. 3. Parabolic Reflector. This articles covers the application of parabolas in everyday life. |
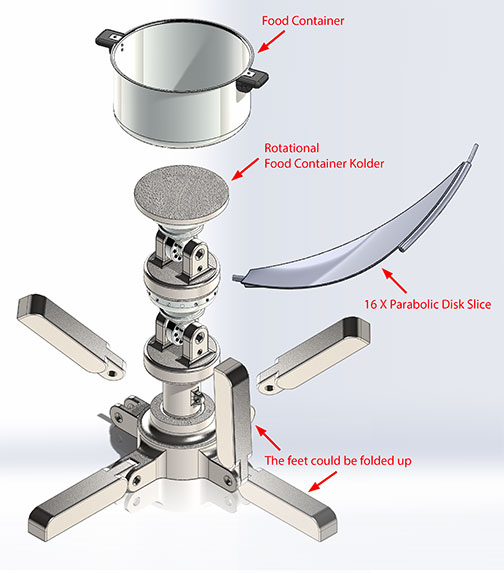
Figure SO-5A. The four feet on the base could be folded up to shrink the volume of the whole equipment and allow it to be packaged during transportation.
Alternatively, in a lot of solar cooker design, the food container could be hung from a pole-beam structure attached to the base of the solar cooker, as shown in the above-mentioned YouTube videos.
|
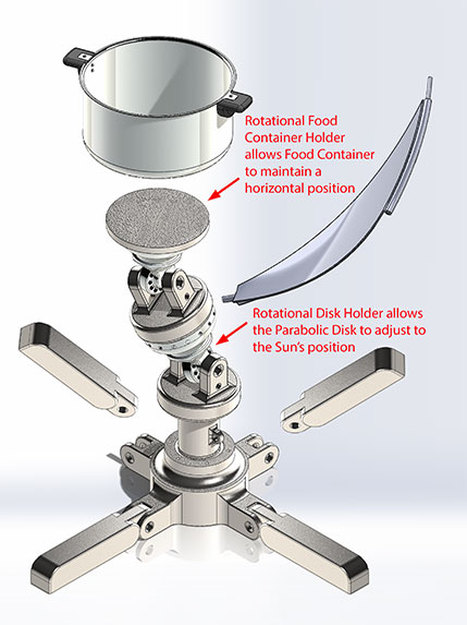
Figure SO-5. The Rotational Food Container Holder, installed on top of the Rotational Disk Holder, could be tilted and fixed to the horizontal (leveled) position, while the Rotational Disk Holder is rotated to any convenient angle to adjust to the Sun’s position, so as to hold the food container steadily.
|
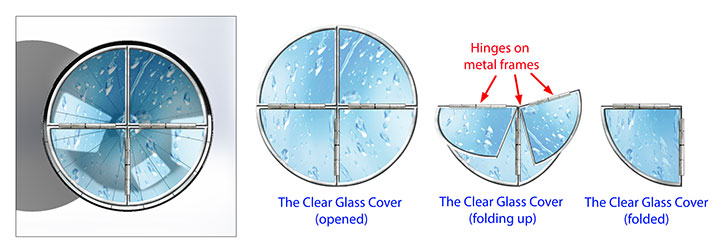
Figure SO-6. A Clear Glass Cover could be used to cover the Parabolic Disk and create a closed space so as to trap the thermal energy inside (left). This foldable Clear Glass Cover is divided into four sections and hinged on three edges between adjacent sections. Metal frames protect the glass. When folded up, the Clear Glass Cover is approximately 1.5 feet by 1.5 feet by 1 inch in dimensions.
|
Design of folding components helps to save valuable storage space, and is a useful strategy to achieve multiple functionality in product design.
设计可折叠的部件有助于节省宝贵的储存空间, 因而是一种达到多功能目标的有用的战略。 |
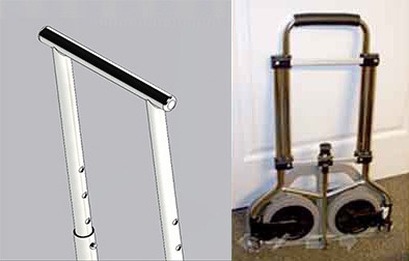
Figure SO-7 (Top). A built-in dolly with handle and stripes could be incorporated into the Portable Solar Cooker and Oven, to make it easily portable.
This handle and stripes set-up is similar to the one used in the SuniSea Portable Tabletop and Stationery Box project. It allows the product to be easily transported from one place to another.
|
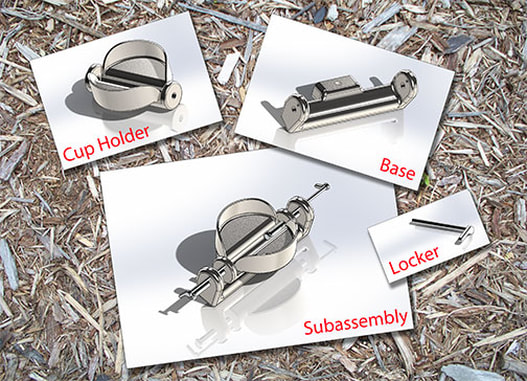
Figure SO-8. Students Roger Monarrez and Willy Fonkoue also used an old satellite disk and a used reclining and relaxing office chair with wheels to design and prototype a small solar oven for boiling a cup of water, and used the 3D printer available at school facility to make the prototype of a cup holder. Shown here is my design for the cup holder for the alternative project.
|
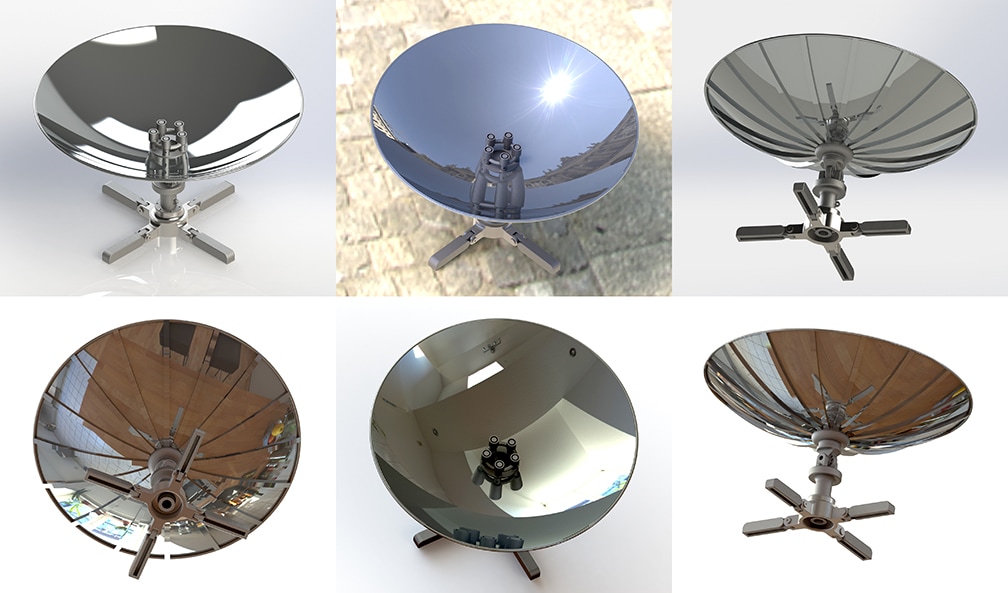
Figure SO-9. Photo-realistic rendering of the solar cooker in SolidWorks.
Suggested Project:
The following categories of students could adopt the assignment listed below to design a Portable Solar Cooker:
For undergraduate students (mechanical/electrical engineering, and industrial design) in senior-year design project courses, design and prototype a Portable Solar Cooker and Energy Storage using a parabolic dish (approximately 4 feet in diameter and composed of 16 slices as shown in this page), which can automatically change its angle relative to the leveled ground surface so as to adjust to the Sun’s position throughout the day time, using a sensor-driven motor, or a programmed timing device connected to the motor; this parabolic dish should also serve as a collection of small-sized solar panel tiles that can convert solar energy into electrical energy to be stored in a battery (preferably a stock item available in the marketplace); the parts, subassemblies of the solar cooker should be designed in such a way that they could be easily assembled and disassembled within 15 minutes; the solar cooker’s base should be foldable and attached to a foldable and wheeled dolly, which can be set straight up or flat on the ground and includes storage containers for the stakes of parabolic dish slices and the clear glass oven cover); the height of the whole system should be about the height of a college classroom table (about 30 inches) when the parabolic dish is set at a leveled position (as shown in Figure SO-1).
For community college students (computer-aided drafting/design, industrial design, and manufacturing technology) in design or portfolio preparation courses, design and prototype a Portable Solar Cooker using a parabolic dish (approximately 4 feet in diameter and composed of 16 slices as shown in this page), which can change its angle relative to the leveled ground surface so as to adjust to the Sun’s position throughout the day time, using a simple mechanical device; the parts, subassemblies of the solar cooker should be designed in such a way that they could be easily assembled and disassembled within 15 minutes; the solar cooker’s base should be foldable and attached to a foldable and wheeled dolly, which can be set straight up or flat on the ground and includes storage containers for the stakes of parabolic dish slices and the clear glass oven cover); the height of the whole system should be about the height of a college classroom table (about 30 inches) when the parabolic dish is set at a leveled position (as shown in Figure SO-1).
Students from both categories could email me the digital photos of the mockups and working prototypes, and screen shots of the major subassemblies and overall assembly of the Portable Solar Cooker for publication in the Submitted Projects Section of this website. Please note that (1) the project must be completed in parametric modelers (such as SolidWorks, Mechanical Desktop, Inventor, SolidEdge, CATIA, Pro-Engineer), (2) the parts, subassemblies and assemblies must be zoomed to the largest size possible and the screen shots should indicate the software used, (3) for the protection of intellectual property rights, do NOT email the original CAD files of the 3D models, or any 2D drawing files, or the screen shots of any individual part. Please include a short paragraph stating your request and authorization to publish it on my website’s Student Works Section, including your name and the name of your school; if you want viewers to contact you through email, please indicate so. Please number your screen shots and include short paragraphs to describe the major subassemblies and assemblies. In addition, if you upload a video related to your prototype and testing on YouTube, please email me the URL. If your work has been recommended by your instructor, or is interesting to me, I will upload it to my website. To create a screen shot, press the Print Screen Sys Rq key on the top right corner of your keyboard to copy the screen image into the Clipboard, create a new file in Photoshop (Ctrl+n), paste the image (Ctrl+v), flatten the layers and save the file as a JPEG file; if you do not have access to Photoshop, then create a new file in Microsoft Word, paste the screen shot (Ctrl+v) and save the file.
About Product Design and Engineering Process …
According to Wikipedia, the free encyclopedia, “The engineering design process is the formulation of a plan to help an engineer build a product with a specified performance goal. This process involves a number of steps, and parts of the process may need to be repeated many times before production of a final product can begin. […] It is a decision making process (often iterative) in which the basic sciences, mathematics, and engineering sciences are applied to convert resources optimally to meet a stated objective. Among the fundamental elements of the design process are the establishment of objectives and criteria, synthesis, analysis, construction, testing and evaluation.” Many definitions of design process are available online or from college textbooks. Based on my experience and understanding, typical product design and engineering process could include the following steps:
1. Research: This step includes (1) collection of relevant data, through Internet search, (2) review of library books, trade journals, government documents, vendor catalogs, (3) market analysis, and (4) purchase of samples of existing products for “reverse engineering” (i.e., taking apart existing products to learn the features and the scientific principles guiding the existing design), and (5) consultation with experts. Being multi-disciplinary with broad knowledge in both STEM and humanities is a great asset in this step. The outcome of this step is to clearly define the design issue (“What products need to be developed?”). If the products concerned are internal devices (such as motherboards inside the computers, or gear sets or motors inside any product), then the research could involve only scientific, technological and economic aspects of the products (this is engineering that focuses principally on functionality or utility of products). In addition to the above, for consumer products with external packaging or features (such as computers, keyboard, food-processing appliances, toys), then the aesthetic (“how they look like?”) and ergonomics (“how safe and convenient they are for end users?”) should also be studied; in other words, this is a process of combining art, science, engineering and technology to create new products that other people can use (this is industrial design that focuses principally on aesthetic and user-interface aspects of products).
2. Conceptualization: This step is also called “design ideation;” and is aimed at generating useful ideas for design solution. “Brainstorming” technique could be used to accomplish this goal; without being judgmental, all possible solutions could be proposed with quick thumbnail sketches and notes, analyzed and compared to select a few most interesting ones to determine their feasibility. Creativity and open-mindedness are very important in this step. For consumer products with external packaging or features, then the aesthetics, ergonomics, functionality, and/or usability aspects of the products should also be subjects of “brainstorming.”
3. Feasibility assessment: This step is aimed at determine if the possible solutions proposed at previous step are (1) scientifically and technologically possible, and (2) within cost constraints. If yes, they could proceed into the design phase. Experience and good judgment are important in this step. For consumer products with external packaging or features, then the aesthetics and ergonomics aspects of the products should also be subjects of feasibility assessment (“will the shapes, colors, and other visual attributes be culturally acceptable to the intended customers?” “Are the products convenient to use?”).
4. Establishing the design requirements: The criteria to meet in the product performance (hardware and software parameters, maintainability, availability, and testability) is determined in this step. For consumer products with external packaging or features, then the requirements for ergonomics (safety and convenience) should also be established.
5. Preliminary design: This step is aimed at defining the overall system configuration from the selected initial design concept(s), with schematics, diagrams, and layouts of the project, to create the general framework to build the project on. In this step, engineer’s notebooks; or sketch books could be used to record design ideas as legal documents for the protection of intellectual property rights creating mock prototypes; mockups (quick visual prototypes built in paper, foam core, clay and other “easy and soft” materials) could also be used to study the volume and function of the parts.
6. Detailed design: This step starts the “official” design process; engineers and product designers use CADD programs (such as SolidWorks, CATIA, Inventor, SolidEdge, Pro-Engineer, and others) to create 3D models of parts, subassemblies and assemblies of products, to test them through digital simulations, to refine the 3D models and to create 2D working drawings. Although CADD programs are capable of creating any type of 3D models, sometimes, if artistic or decorative forms with irregular shapes are involved, parts of the products could be modeled manually with traditional materials such as clay, wood and others, and incorporated into the CADD-generated 3D models via 3D scanners (this takes place more often in consumer product design).
7. Prototyping and testing: In the old days, prototype (either visual or working) were made with manually-controlled power equipment or tools. Nowadays, CNC-driven equipment, 3D printers and CAM programs are used to make both visual and working prototypes. If the products concerned involve mechanical and electrical devices or electronic components, then testing is an absolutely required task.
8. Production planning and tool design: This step involves (1) planning for the mass-production of the project (plant layout, flow diagram and others), (2) selection of the appropriate materials, tools and equipment to be used in the manufacturing and assembling of the part, (3) design and fabrication of special tools, such as jigs, fixtures, and molds. This step completes the “official” design process. The project is then moved to custom fabrication or mass production phase.
About Intellectual Property Right and Innovation in Product Design and Engineering …
In the real-world marketplace, over 70% of products are re-design of existing products with improved features or integration of existing features available in marketplace and brand-new features. It is perfectly ethical and lawful to draw reference from other people or companies’ existing design as sources of inspiration for new and unique design solutions. It is NEITHER ethical NOR legal to copy the tangible design solutions made by others, which are protected by patent laws (however, after the expiration of a patent, this legal issue ceases to exist. In addition, patent laws do NOT protect abstract or generic design ideas or scientific principles or pure knowledge). For example, in the SuniSea COMBO Multi-functional Food Processor, the principle of creating an ecologically-friendly and multi-functional product as well as the idea of achieving this goal by creating a master unit with variable-speed motor that could change position are both “generic” and/or “abstract,” and thus are NOT subject to protection of intellectual property rights under patent laws; however, the tangible design of all parts, sub- assemblies and assembly, with their concrete shapes, colors, dimensions and materials used could be protected through application for patents. Similarly, the ideas expressed in any book (which are “generic” or “abstract”) are NOT protected by copyright laws; however, the chapters of the book (“tangible” and “concrete”) are protected (although under the “fair use” provision, quotation of some paragraphs is allowed as long as the author’s name is mentioned).
According to Wikipedia, Intellectual property rights usually cover two categories of unique design or invention, i.e., (1) purely utilitarian design (such the design of a motor or a gear set), and (2) visual design (creation of a unique shape, configuration or composition of pattern or color, or combination of pattern and color in three dimensional form). “An industrial design can be a two- or three-dimensional pattern used to produce a product, industrial commodity or handicraft. Under the Hague Agreement Concerning the International Deposit of Industrial Designs, a WIPO-administered treaty, a procedure for an international registration exists. An applicant can file for a single international deposit with WIPO or with the national office in a country party to the treaty. The design will then be protected in as many member countries of the treaty as desired.”
Innovation in product design and engineering could fall under one of two categories:
1. Innovation triggered by demand: When developing a new product or re-developing an existing product for another purpose could satisfy a new demand in the market, available scientific knowledge, technology and aesthetic values could be re-combined to create new products with innovative features. This is a rather economical and more frequently occurring type of innovation. Before the invention of digital cameras, development of traditional cameras over and over falls into this category. Most of the industrial design (or consumer product design) projects, which are based on the integration of applied art and applied science to improve the aesthetics, ergonomics, functionality, usability and marketability of a product, belong to this category.
2. Innovation generated by invention: When new scientific knowledge or technology are developed through long-term investment by private and governmental institutions, there could then triggered a new wave of innovation; for example, the invention of solar panels makes development of solar vehicles and houses possible. This is a rather expensive and less frequently occurring type of innovation, since it takes huge investment of monetary and human resources in research and development with no guarantee that such endeavors could succeed. An example of this is the birth of computers and Bill Gates’ success stories.
Recommended YouTube Videos: Solar Cookers
Edward Locke's SuniSea Studio
Important Websites and Webpages Navigator
At the bottom of the Home page.
Please click the Home button below to return to the Home page.
Important Websites and Webpages Navigator
At the bottom of the Home page.
Please click the Home button below to return to the Home page.

|
Contact Information:
[email protected] | Phone number for clients only. |
